Did you know you can import optimised versions of Revit models directly into SketchUp — and do far more with them than most people realise?
SketchUp’s Studio subscription includes a native Revit Importer that brings your .rvt files in cleanly: geometry is optimised, Revit families become SketchUp components, categories map to tags, and levels become section planes. The result is a lighter, more workable model ready for the five workflows below.
In this post, based on SketchUp’s own official walkthrough video, we break down each of the five use cases — with added context from your local SketchUp Gold Reseller in Southern Africa.
1. Create Stunning Presentation Visuals
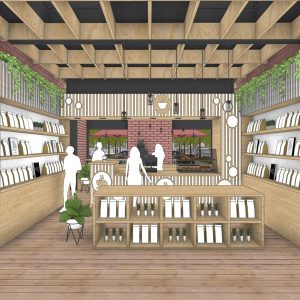
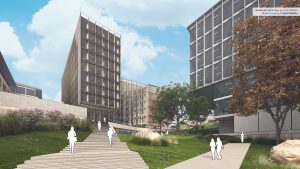
The first and most immediately impactful use of a Revit model in SketchUp is turning raw architectural data into compelling visuals that win clients and communicate design intent clearly.
The process starts with context. Using SketchUp’s Add Location feature, you position the imported Revit model in its real-world setting — pulling in 3D buildings, terrain, and aerial photography from a live map tile. Your project is instantly grounded in reality, not floating in white space.
Next, detail. SketchUp’s 3D Warehouse — the world’s largest online model library — gives you instant access to trees, people, cars, street furniture, and everything in between. These elements add the life and scale that transform a structural model into something a client can emotionally connect with.
Then, materials. SketchUp supports physically-based rendering (PBR) materials with full control over metalness, roughness, normal maps, and ambient occlusion. Applied to the Revit geometry, these materials push the model from diagrammatic to photorealistic.
- Position the model in real-world context using Add Location
- Populate the scene with 3D Warehouse entourage — people, trees, vehicles
- Apply PBR materials for photorealistic surface quality
- Add an HDRI sky dome for realistic lighting and ambiance
- Export presentation-ready images for tenders, pitches, or public consultation
“By pairing PBR materials with added context and detail, we’ve quickly transformed this Revit model into a presentation-ready visual.”
iRender note: The same model can produce daytime and nighttime scenes simply by swapping the sky dome — no rebuilding required. One model, multiple deliverables.
2. Export Animations for Communication & Construction
Static images tell part of the story. Animations tell the rest — and SketchUp makes them far more accessible than dedicated animation software.
The video highlights two compelling animation types, both created directly from the Revit-based SketchUp model:
- Process animations— such as sequencing the installation of cross-laminated timber (CLT) structural panels, showing safety zones and crane movements with crystal-clear spatial clarity from both a site-wide perspective and a worker’s viewpoint
- Detail fly-throughs— navigating through complex engineering zones, such as assessing an electrical strategy’s relationship to the CLT structure and visualising how plant rooms will be arranged
These animations serve as communication assets for site teams, subcontractors, and clients alike — especially valuable when spatial relationships are difficult to convey in 2D drawings.
Why this matters: In South Africa’s construction sector, safety briefings, contractor coordination, and client sign-off processes all benefit from animated walkthroughs that everyone — regardless of their drawing literacy — can follow immediately.
3. Share the Model & Capture Feedback in Real Time
One of the most practically useful features highlighted in the video is SketchUp’s built-in model sharing and collaboration capability — introduced in the newest version of SketchUp.
You can now share a model directly via a link or email with a colleague, client, subcontractor, or consultant. The recipient can navigate the model in their browser — no SketchUp licence required — and leave comments pinned to specific geometry and views.
The video demonstrates this with a collaborator joining the model remotely. Her cursor is visible in real time. She navigates to the plant room, pins a comment to an electrical unit, and flags that the capacity is too low — citing the specific unit and suggesting a rearrangement. The comment is tied to the exact view she was looking at when she left it.
“I can see exactly what she was looking at when she left this comment.”
- Share via link or email — no SketchUp licence needed for recipients
- Comments are pinned to geometry and associated with a specific view
- Real-time cursor visibility for live collaborative sessions
- Feedback is contextual, precise, and directly actionable
iRender tip:This eliminates the round-trip of exporting PDFs, receiving mark-up emails, and trying to interpret which view a comment refers to.
4. Action Feedback & Rapidly Iterate Design Options
Once feedback has been captured, SketchUp’s intuitive modelling tools make it fast to action and iterate — the kind of rapid, exploratory design work that Revit is not optimised for.
The video walks through a real scenario: the plant room flagged in the collaboration session needs redesigning. The larger electrical units don’t fit within the original layout while maintaining required fire separation distances and maintenance access zones.
Using SketchUp’s direct push-pull and component tools, the designer quickly tests multiple layout options — moving units around, assessing clearances, and iterating until a solution emerges that satisfies all constraints.
- View the problem from isometric and plan perspectives simultaneously
- Swap components and test multiple arrangements in minutes
- Identify constraint conflicts visually — fire separation, maintenance access — before they become site problems
- Present resolved options back to the team for sign-off
The bigger picture: This is where SketchUp’s speed advantage is most tangible. Design iteration that would take hours in Revit — or require a separate parametric tool — happens in SketchUp in minutes.
5. Produce Clear 2D Documentation in LayOut
The fifth use case brings the workflow full circle — from a visualised, iterated design back to a formal, dimensioned drawing. SketchUp’s companion application, LayOut (included with every Pro and Studio subscription), is purpose-built for this.
In the video, the designer takes a view of the resolved plant room directly into LayOut, then builds a detailed drawing that:
- Overlays all design constraints — fire escape routes, maintenance zones, turning circles for accessibility
- References Revit metadata from tagged components directly within the LayOut sheet
- Includes dimensions and annotations for clear construction communication
- Sits the new layout beside the old one for a clear before/after comparison
The result is a rich, informative drawing that not only shows what has been designed but actively demonstrates that the design works within all its constraints — something a plain view or render cannot do alone.
LayOut is underused. Many SketchUp subscribers produce their drawings in separate applications. If you are managing SketchUp visuals and documentation separately, LayOut can consolidate both into one live, model-linked workflow — saving hours per project.